Thank YOU! It's Customer Appreciation Week!
EXTRA 11% OFF Orders $100+ With Code: THANKYOU
×
Spellbinders - Shapeabilities Collection - D-Lites - Die Cutting and Embossing Template - Cattails

  • Spellbinders - Shapeabilities Collection - D-Lites - Die Cutting and Embossing Template - Cattails
  • thmb_1

Spellbinders - Shapeabilities Collection - D-Lites - Die Cutting and Embossing Template - Cattails

Take 9% OFF or 11% OFF Your Order (Code: THANKYOU)  View Details
Item Discontinued & Out of Stock
Please try related products below.

Put on your overalls and get to work creating your next layout with the Spellbinders Cattails D-Lites Die. This die is designed to add the perfect embellishment to your paper crafts. It can also be used to emboss and stencil. Designed by Spellbinders Themes: Fall, Thanksgiving, Summer, Outdoors, Card Makin...  Full Description & Details
Related Products
Projects
Description & Details
Put on your overalls and get to work creating your next layout with the Spellbinders Cattails D-Lites Die. This die is designed to add the perfect embellishment to your paper crafts. It can also be used to emboss and stencil.
  • Designed by Spellbinders
  • Themes: Fall, Thanksgiving, Summer, Outdoors, Card Making
  • Part of the Shapeabilities collection
  • Approximate die measurement: 2 1/4" x 3 1/2"
Brand
Category
SKU
pp-sr-s2002
UPC
879216017894
Videos
Product Reviews
Avg. Rating (7 total)
57% of buyers would recommend
  • Wonderful die but you must follow certain steps to obtain an intact diecut


    By: angelhelp
    0 seconds ago
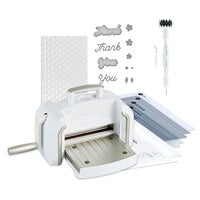
    I love this die and all "nature" dies, however the resulting diecut can be tricky to remove. After ruining a bunch of cardstock and paper in repeated attempts, here's what I learned:

    1. Obtain UNSCENTED dryer sheets. Scented ones will gum up the die and the paper or cardstock.

    2. Unfold 4 dryer sheets and stack them, one atop the next.

    3. Place the die onto the dryer sheets and run through your BigShot or other diecutting machine, as if you were intentionally diecutting the dryer sheets. This action lubricates the die.

    4. Next, run JUST the die and cardstock/paper through the machine, NO dryer sheets. The cardstock/paper WILL likely stick to the die. Have no fear...

    5. Place the die WITH ITS STUCK CARDSTOCK/PAPER onto the dryer sheet stack (you can reuse that same stack of 4 sheets for MANY diecuts) and run this through the machine.

    6. If you're worried, go back and forth an extra time. Now gently remove your intact (yes, it will almost certainly be intact!) diecut.

    7. To make more with the same die, you don't need to relubricate it until you've made a half-dozen or so diecuts. You ABSOLUTELY must not skip any other step in the sequence, though.

    The youtube video link where I learned this technique is: https://www.youtube.com/watch?v=kQx_rKUwjsQ She is Deb Valder and will answer any emails you send (link comes with the video) if you still have problems. I too was in despair with this die and other beautiful detailed dies, but this technique REALLY works as long as you follow each step and take no shortcuts. The results are well worth the effort!

    Was this Review Helpful?  Yes  |  No Thank you! Report Review as Inappropriate? Sign In to Report This review has been reported. Thank you!   (7 out of 7 found this review helpful.)
    Add a Comment
        Delete

  • Verified Buyer

    Tears when I try to remove it.

    This is such a beautiful die, it's a shame that the detail is so fine that you can't remove the cut intact. I always use waxed paper between the die and cardstock, but that didn't help here. I glued the pieces of my final attempt back together and used it on a page, but I doubt that I'll try it again. Does anyone have another solution?

    Was this Review Helpful?  Yes  |  No Thank you! Report Review as Inappropriate? Sign In to Report This review has been reported. Thank you!   (7 out of 7 found this review helpful.)

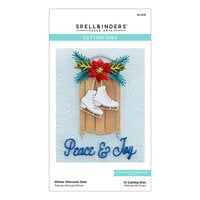
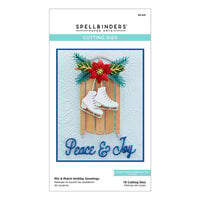
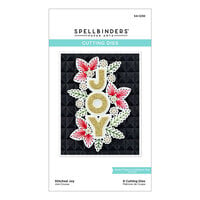
    Used in this project: aka Hondo


  • Verified Buyer

    cattails

    This item is to detailed. It didn't matter what weight paper I tried. The paper would rip. I WOULD NOT recommend this die cut tp anyone.

    Was this Review Helpful?  Yes  |  No Thank you! Report Review as Inappropriate? Sign In to Report This review has been reported. Thank you!   (5 out of 5 found this review helpful.)

  • Verified Buyer

    Nice small die

    This is a great little die, can be used seasonally or for masculine cards, which is why I bought it.

    Was this Review Helpful?  Yes  |  No Thank you! Report Review as Inappropriate? Sign In to Report This review has been reported. Thank you!

  • Verified Buyer

    Cattail die

    Excellent for card making.

    Was this Review Helpful?  Yes  |  No Thank you! Report Review as Inappropriate? Sign In to Report This review has been reported. Thank you!

  • Verified Buyer

    cattails

    very detailed cuts well

    Was this Review Helpful?  Yes  |  No Thank you! Report Review as Inappropriate? Sign In to Report This review has been reported. Thank you!

  • doesn't cut through

    It is very pretty and I thought I'd use it a lot, but it doesn't cut all the small openings all the way through. I had to use a small scissors and cut along the lines. I tried sending it through the machine 3-4 times and it still didn't cut. The metal edges aren't long enough. I did try it on different weights of cardstock also. Too bad, I like the design.

    Was this Review Helpful?  Yes  |  No Thank you! Report Review as Inappropriate? Sign In to Report This review has been reported. Thank you!

You must be signed in to comment. Please click here to sign in.

Questions & Answers
  • unknown
    An Anonymous User
    I have been unable to get this die to cut a clean usable product. Any suggestions?   By: User (07-Jul-16) Helpful Question?  Yes  |  No Thank you! Report Inappropriate This question has been reported. Thank you!
    • HI, since you don't not say what machine you are using, here is some general info that may help you:

      "This die is very intricate so we recommend placement of the die on the edge of the plating, left or right. 65# or less weight for the paper, smooth cardstock only and wax paper is a must between the die and media that is being cut. After the first feed, if there is any incomplete cut, move the die on the plating to place the uncut area where the machine provides the needed pressure to complete the cut…. Usually where it cut on the first feed. It may take a couple of feeds with movement but never more than three if the customers uses the best pressure of their machine. If a spot is not cut completely a shim placed just at that spot can help as well." - Spellbinders Customer Service By: Janna L (07-Jul-16) Helpful Answer?  Yes  |  No Thank you! Report Inappropriate This Answer has been reported. Thank you!
    Show 1 Answer Hide Answer Not Yet Answered      
    Add Answer     
    1
You need to sign in first. Please click here to sign in.